19.11.2022, 19:21
(Dieser Beitrag wurde zuletzt bearbeitet: 19.04.2023, 18:01 von Jules Dreki.)
Teil1: https://service-silberwelten.de/showthread.php?tid=441
Teil2: https://service-silberwelten.de/showthread.php?tid=442
Teil3: https://service-silberwelten.de/showthread.php?tid=443
(Siehe Ergänzung am Ende)
Quelle: https://linuxconfig.org/how-to-use-bridg...rt-and-kvm
Voraussetzung für die folgende Konfiguration ist, das Eurer Rechner über 2 Netzwerkschnittstellen verfügt.
Eure eigentliche Netzwerkschnittstelle solltet ihr nicht mit einer Bridge verbinden, da diese dann ihre IP verliert.
Die Bridge br0 sollte an eine eigene zweite Netzwerkschnittstelle gebunden werden.
Das Ergebnis sollte jedenfalls sein, dass die VMs innerhalb Eures Netzwerkes von anderen Rechnern aus zu erreichen sind.
Wollt ihr das die VM mit dem Opensim-Grid aus dem Internet erreichbar ist, müßt Ihr noch die entsprechenden Ports in Eurer Firewall freigeben (eigenes Thema ;-) ).
The “default” network
1) Check the default NAT network:
$ sudo virsh net-list --all
Name State Autostart Persistent
--------------------------------------------
default active yes yes
2) Check the default network definition:
$ sudo virsh net-edit default
<network>
<name>default</name>
<uuid>xxxxxxxxxxxxxxxxxxxx</uuid>
<forward mode='nat'>
<nat>
<port start='1024' end='65535'/>
</nat>
</forward>
<bridge name='virbr0' stp='on' delay='0'/>
<mac address='xxxxxxxxxxxx'/>
<ip address='192.168.xxx.1' netmask='255.255.255.0'>
<dhcp>
<range start='192.168.xxx.2' end='192.168.xxx.254'/>
</dhcp>
</ip>
</network>
3) Check the bridge device:
$ ip link show type bridge
4: virbr0: <NO-CARRIER,BROADCAST,MULTICAST,UP> mtu 1500 qdisc noqueue state DOWN mode DEFAULT group default qlen 1000
link/ether xx:xx:xx:xx:xx:xx brd ff:ff:ff:ff:ff:ff
4) Show the interfaces which are part of the bridge:
$ ip link show master virbr0
11: vnet0: <BROADCAST,MULTICAST,UP,LOWER_UP> mtu 1500 qdisc noqueue master virbr0 state UNKNOWN mode DEFAULT group default qlen 1000
link/ether xx:xx:xx:xx:xx:xx brd ff:ff:ff:ff:ff:ff
Use bridged networking for virtual machines
1) Create a new bridge br0:
With the network manager. (ToDo)
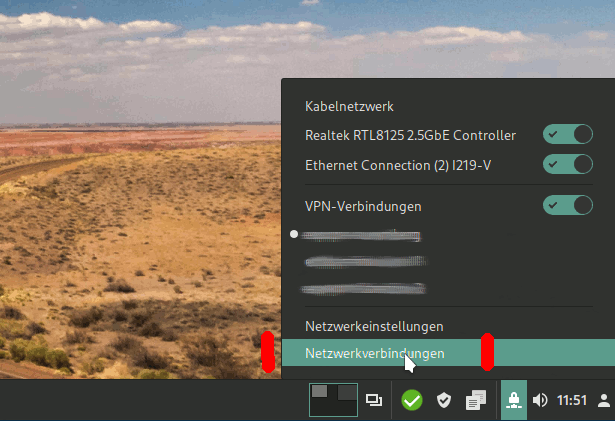
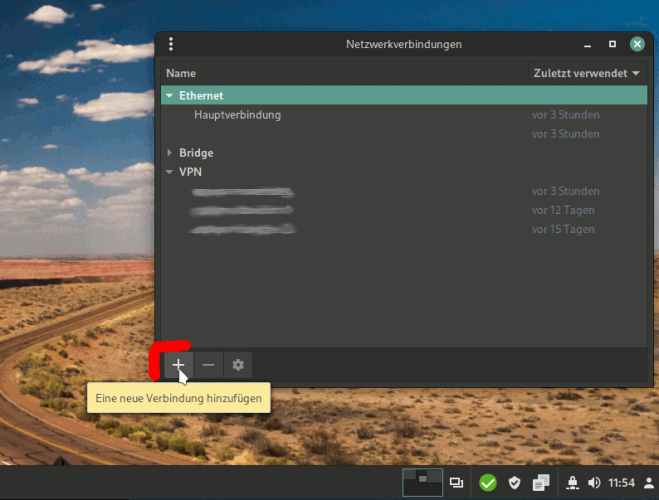
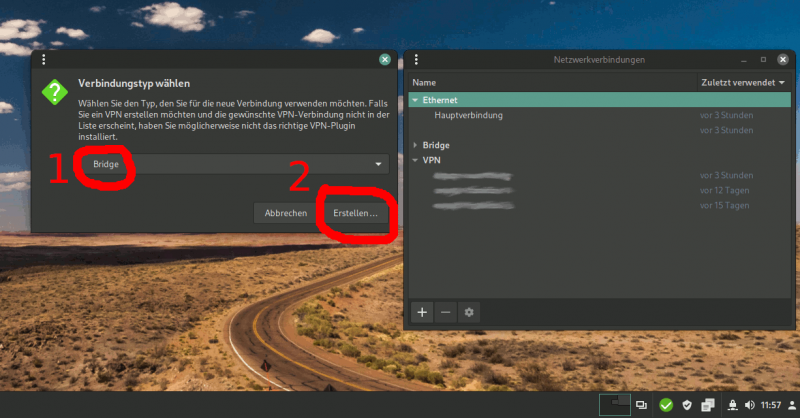
2) Adding a physical ethernet interface to the bridge br0:
With the network manager. Use not the device of the main connection! (ToDo)
2: enp4s0: <BROADCAST,MULTICAST,UP,LOWER_UP> mtu 1500 qdisc fq_codel master br0 state UP group default qlen 1000
link/ether xx:xx:xx:xx:xx:xx brd ff:ff:ff:ff:ff:ff
3: eno1: <BROADCAST,MULTICAST,UP,LOWER_UP> mtu 1500 qdisc fq_codel state UP group default qlen 1000
link/ether xx:xx:xx:xx:xx:xx brd ff:ff:ff:ff:ff:ff
altname enp0s31f6
inet 192.168.xxx.xxx/24 brd 192.168.xxx.xxx scope global dynamic noprefixroute eno1
valid_lft 863604sec preferred_lft 863604sec
inet6 xxxx:xxxx:xxxx:xxxx:xxxx:xxxx:xxxx:xxxx/64 scope global dynamic noprefixroute
valid_lft 6807sec preferred_lft 3207sec
inet6 xxxx::xxxx:xxxx:xxxx:xxxx/64 scope link noprefixroute
valid_lft forever preferred_lft forever
4: virbr0: <NO-CARRIER,BROADCAST,MULTICAST,UP> mtu 1500 qdisc noqueue state DOWN group default qlen 1000
link/ether xx:xx:xx:xx:xx:xx brd ff:ff:ff:ff:ff:ff
inet 192.168.xx.1/24 brd 192.168.xx.255 scope global virbr0
valid_lft forever preferred_lft forever
5: br0: <BROADCAST,MULTICAST,UP,LOWER_UP> mtu 1500 qdisc noqueue state UP group default qlen 1000
link/ether xx:xx:xx:xx:xx:xx brd ff:ff:ff:ff:ff:ff
inet 192.168.xx.xx/24 brd 192.168.xx.xx scope global dynamic noprefixroute br0
valid_lft 863493sec preferred_lft 863493sec
inet6 xxxx:xxxx:xxxx:xxxx:xxxx:xxxx:xxxx:xxxx/64 scope global dynamic noprefixroute
valid_lft 6807sec preferred_lft 3207sec
inet6 xxxx::xxxx:xxxx:xxxx:xxxx/64 scope link noprefixroute
valid_lft forever preferred_lft forever
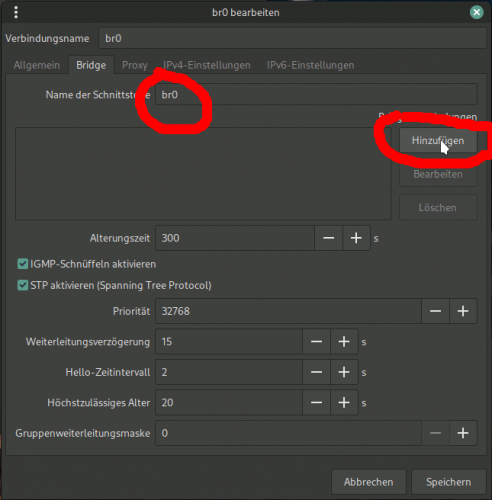
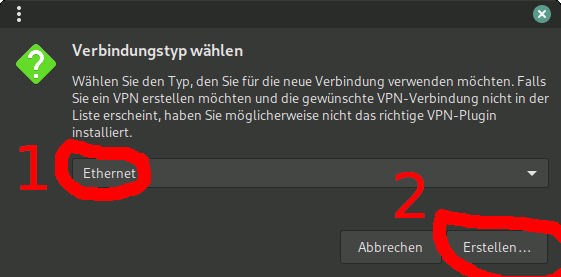
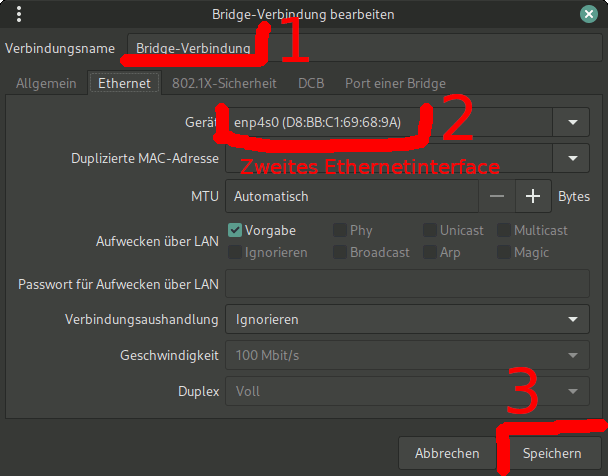
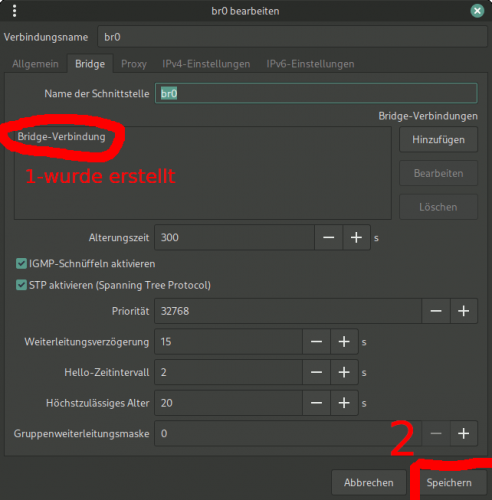
Wird jetzt eine VM gestartet, wird automatisch deren virtuelle Schnittstelle der Bridge hinzugefügt. Der Eintrag Bridge-Verbindung wurde eben gerade manuell erstellt, und steht für die physische Ethernetschnittstelle.
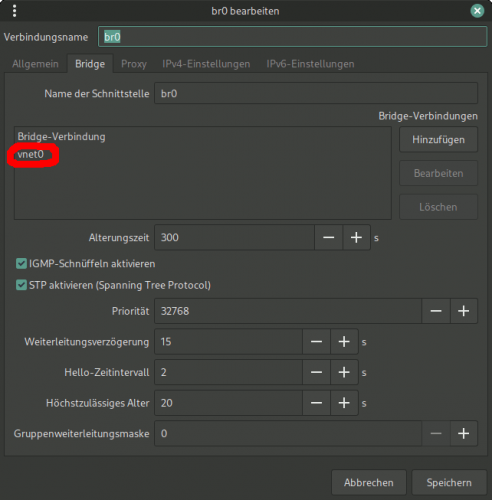
3) Disabling netfilter for the bridge:
$ sudo nano /etc/sysctl.d/99-netfilter-bridge.conf
net.bridge.bridge-nf-call-ip6tables = 0
net.bridge.bridge-nf-call-iptables = 0
net.bridge.bridge-nf-call-arptables = 0
$ sudo modprobe br_netfilter
$ sudo nano /etc/modules-load.d/br_netfilter.conf
br_netfilter
$ sudo sysctl -p /etc/sysctl.d/99-netfilter-bridge.conf
Creating a new virtual network
Create file bridged-network.xml
$ nano ~/temp/bridged-network.xml
<network>
<name>bridged-network</name>
<forward mode="bridge" />
<bridge name="br0" />
</network>
Use file bridged-network.xml
$ sudo virsh net-define bridged-network.xml
$ sudo virsh net-start bridged-network
$ sudo virsh net-autostart bridged-network
$ sudo virsh net-list --all
Name Status Automatischer Start Bleibend
------------------------------------------------------------
bridged-network Aktiv ja ja
default Aktiv ja ja
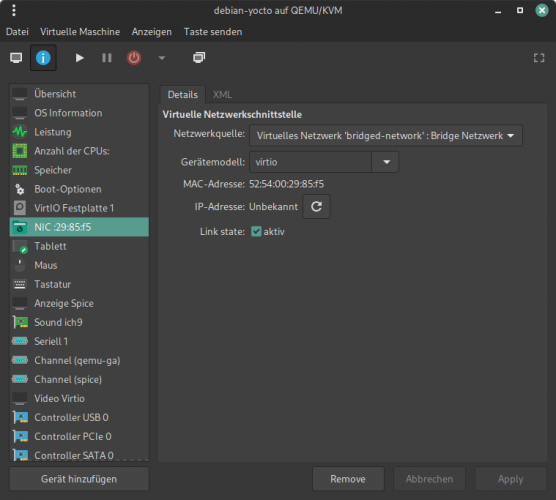
Create VM with the Virt-Manager.
Network selection:
Virtual network 'bridged-network': Bridge network
Windows Guest Settings
Set the computer name.
Linux Guest Settings
/etc/hosts:
--------------
127.0.0.1 localhost
127.0.1.1 <name>
# The following lines are desirable for IPv6 capable hosts
::1 localhost ip6-localhost ip6-loopback
ff02::1 ip6-allnodes
ff02::2 ip6-allrouters
/etc/hostname:
--------------------
<name>
/etc/network/interfaces:
--------------------------------
# This file describes the network interfaces available on your system
# and how to activate them. For more information, see interfaces(5).
source /etc/network/interfaces.d/*
# The loopback network interface
auto lo
iface lo inet loopback
# The primary network interface
allow-hotplug enp1s0
iface enp1s0 inet dhcp
hostname <name>
Statt das File "/etc/network/interfaces" wäre hier noch "/etc/dhcpcd.conf" möglich. Das kommt darauf an um welches Linux und welchen Installationsumfang es geht.
Wichtig sind das Aktivieren von DHCP und die Angabe des Hostnamen, damit dieser bei der DHCP-Anfrage mit gesendet wird.
PS: An den Markierungen (ToDo) fehlen Bilder, diese liefere ich noch nach. Diese Stellen weichen auch von der ursprünglichen Anleitung ab. Dort werden die Netzwerkschnittstellen permanent/statisch über Dateien direkt konfiguriert. In der Standardinstallation von Linux-Mint wird das Netzwerk aber grafisch/dynamisch durch den Network-Manager konfiguriert. Beide Konfigurations-Methoden sollte man nicht mischen! Für Notebooks ist es aus meiner Sicht am sinnvollsten beim Network-Manager zu bleiben.
Teil2: https://service-silberwelten.de/showthread.php?tid=442
Teil3: https://service-silberwelten.de/showthread.php?tid=443
(Siehe Ergänzung am Ende)
Quelle: https://linuxconfig.org/how-to-use-bridg...rt-and-kvm
Voraussetzung für die folgende Konfiguration ist, das Eurer Rechner über 2 Netzwerkschnittstellen verfügt.
Eure eigentliche Netzwerkschnittstelle solltet ihr nicht mit einer Bridge verbinden, da diese dann ihre IP verliert.
Die Bridge br0 sollte an eine eigene zweite Netzwerkschnittstelle gebunden werden.
Das Ergebnis sollte jedenfalls sein, dass die VMs innerhalb Eures Netzwerkes von anderen Rechnern aus zu erreichen sind.
Wollt ihr das die VM mit dem Opensim-Grid aus dem Internet erreichbar ist, müßt Ihr noch die entsprechenden Ports in Eurer Firewall freigeben (eigenes Thema ;-) ).
The “default” network
1) Check the default NAT network:
$ sudo virsh net-list --all
Name State Autostart Persistent
--------------------------------------------
default active yes yes
2) Check the default network definition:
$ sudo virsh net-edit default
<network>
<name>default</name>
<uuid>xxxxxxxxxxxxxxxxxxxx</uuid>
<forward mode='nat'>
<nat>
<port start='1024' end='65535'/>
</nat>
</forward>
<bridge name='virbr0' stp='on' delay='0'/>
<mac address='xxxxxxxxxxxx'/>
<ip address='192.168.xxx.1' netmask='255.255.255.0'>
<dhcp>
<range start='192.168.xxx.2' end='192.168.xxx.254'/>
</dhcp>
</ip>
</network>
3) Check the bridge device:
$ ip link show type bridge
4: virbr0: <NO-CARRIER,BROADCAST,MULTICAST,UP> mtu 1500 qdisc noqueue state DOWN mode DEFAULT group default qlen 1000
link/ether xx:xx:xx:xx:xx:xx brd ff:ff:ff:ff:ff:ff
4) Show the interfaces which are part of the bridge:
$ ip link show master virbr0
11: vnet0: <BROADCAST,MULTICAST,UP,LOWER_UP> mtu 1500 qdisc noqueue master virbr0 state UNKNOWN mode DEFAULT group default qlen 1000
link/ether xx:xx:xx:xx:xx:xx brd ff:ff:ff:ff:ff:ff
Use bridged networking for virtual machines
1) Create a new bridge br0:
With the network manager. (ToDo)
2) Adding a physical ethernet interface to the bridge br0:
With the network manager. Use not the device of the main connection! (ToDo)
2: enp4s0: <BROADCAST,MULTICAST,UP,LOWER_UP> mtu 1500 qdisc fq_codel master br0 state UP group default qlen 1000
link/ether xx:xx:xx:xx:xx:xx brd ff:ff:ff:ff:ff:ff
3: eno1: <BROADCAST,MULTICAST,UP,LOWER_UP> mtu 1500 qdisc fq_codel state UP group default qlen 1000
link/ether xx:xx:xx:xx:xx:xx brd ff:ff:ff:ff:ff:ff
altname enp0s31f6
inet 192.168.xxx.xxx/24 brd 192.168.xxx.xxx scope global dynamic noprefixroute eno1
valid_lft 863604sec preferred_lft 863604sec
inet6 xxxx:xxxx:xxxx:xxxx:xxxx:xxxx:xxxx:xxxx/64 scope global dynamic noprefixroute
valid_lft 6807sec preferred_lft 3207sec
inet6 xxxx::xxxx:xxxx:xxxx:xxxx/64 scope link noprefixroute
valid_lft forever preferred_lft forever
4: virbr0: <NO-CARRIER,BROADCAST,MULTICAST,UP> mtu 1500 qdisc noqueue state DOWN group default qlen 1000
link/ether xx:xx:xx:xx:xx:xx brd ff:ff:ff:ff:ff:ff
inet 192.168.xx.1/24 brd 192.168.xx.255 scope global virbr0
valid_lft forever preferred_lft forever
5: br0: <BROADCAST,MULTICAST,UP,LOWER_UP> mtu 1500 qdisc noqueue state UP group default qlen 1000
link/ether xx:xx:xx:xx:xx:xx brd ff:ff:ff:ff:ff:ff
inet 192.168.xx.xx/24 brd 192.168.xx.xx scope global dynamic noprefixroute br0
valid_lft 863493sec preferred_lft 863493sec
inet6 xxxx:xxxx:xxxx:xxxx:xxxx:xxxx:xxxx:xxxx/64 scope global dynamic noprefixroute
valid_lft 6807sec preferred_lft 3207sec
inet6 xxxx::xxxx:xxxx:xxxx:xxxx/64 scope link noprefixroute
valid_lft forever preferred_lft forever
Wird jetzt eine VM gestartet, wird automatisch deren virtuelle Schnittstelle der Bridge hinzugefügt. Der Eintrag Bridge-Verbindung wurde eben gerade manuell erstellt, und steht für die physische Ethernetschnittstelle.
3) Disabling netfilter for the bridge:
$ sudo nano /etc/sysctl.d/99-netfilter-bridge.conf
net.bridge.bridge-nf-call-ip6tables = 0
net.bridge.bridge-nf-call-iptables = 0
net.bridge.bridge-nf-call-arptables = 0
$ sudo modprobe br_netfilter
$ sudo nano /etc/modules-load.d/br_netfilter.conf
br_netfilter
$ sudo sysctl -p /etc/sysctl.d/99-netfilter-bridge.conf
Creating a new virtual network
Create file bridged-network.xml
$ nano ~/temp/bridged-network.xml
<network>
<name>bridged-network</name>
<forward mode="bridge" />
<bridge name="br0" />
</network>
Use file bridged-network.xml
$ sudo virsh net-define bridged-network.xml
$ sudo virsh net-start bridged-network
$ sudo virsh net-autostart bridged-network
$ sudo virsh net-list --all
Name Status Automatischer Start Bleibend
------------------------------------------------------------
bridged-network Aktiv ja ja
default Aktiv ja ja
Create VM with the Virt-Manager.
Network selection:
Virtual network 'bridged-network': Bridge network
Windows Guest Settings
Set the computer name.
Linux Guest Settings
/etc/hosts:
--------------
127.0.0.1 localhost
127.0.1.1 <name>
# The following lines are desirable for IPv6 capable hosts
::1 localhost ip6-localhost ip6-loopback
ff02::1 ip6-allnodes
ff02::2 ip6-allrouters
/etc/hostname:
--------------------
<name>
/etc/network/interfaces:
--------------------------------
# This file describes the network interfaces available on your system
# and how to activate them. For more information, see interfaces(5).
source /etc/network/interfaces.d/*
# The loopback network interface
auto lo
iface lo inet loopback
# The primary network interface
allow-hotplug enp1s0
iface enp1s0 inet dhcp
hostname <name>
Statt das File "/etc/network/interfaces" wäre hier noch "/etc/dhcpcd.conf" möglich. Das kommt darauf an um welches Linux und welchen Installationsumfang es geht.
Wichtig sind das Aktivieren von DHCP und die Angabe des Hostnamen, damit dieser bei der DHCP-Anfrage mit gesendet wird.
PS: An den Markierungen (ToDo) fehlen Bilder, diese liefere ich noch nach. Diese Stellen weichen auch von der ursprünglichen Anleitung ab. Dort werden die Netzwerkschnittstellen permanent/statisch über Dateien direkt konfiguriert. In der Standardinstallation von Linux-Mint wird das Netzwerk aber grafisch/dynamisch durch den Network-Manager konfiguriert. Beide Konfigurations-Methoden sollte man nicht mischen! Für Notebooks ist es aus meiner Sicht am sinnvollsten beim Network-Manager zu bleiben.
Mein Heimatgrid: https://swissgrid.opensim.ch


